
Kitchen Cabinet Staining – How To Stain Kitchen Cabinets Like a Professional
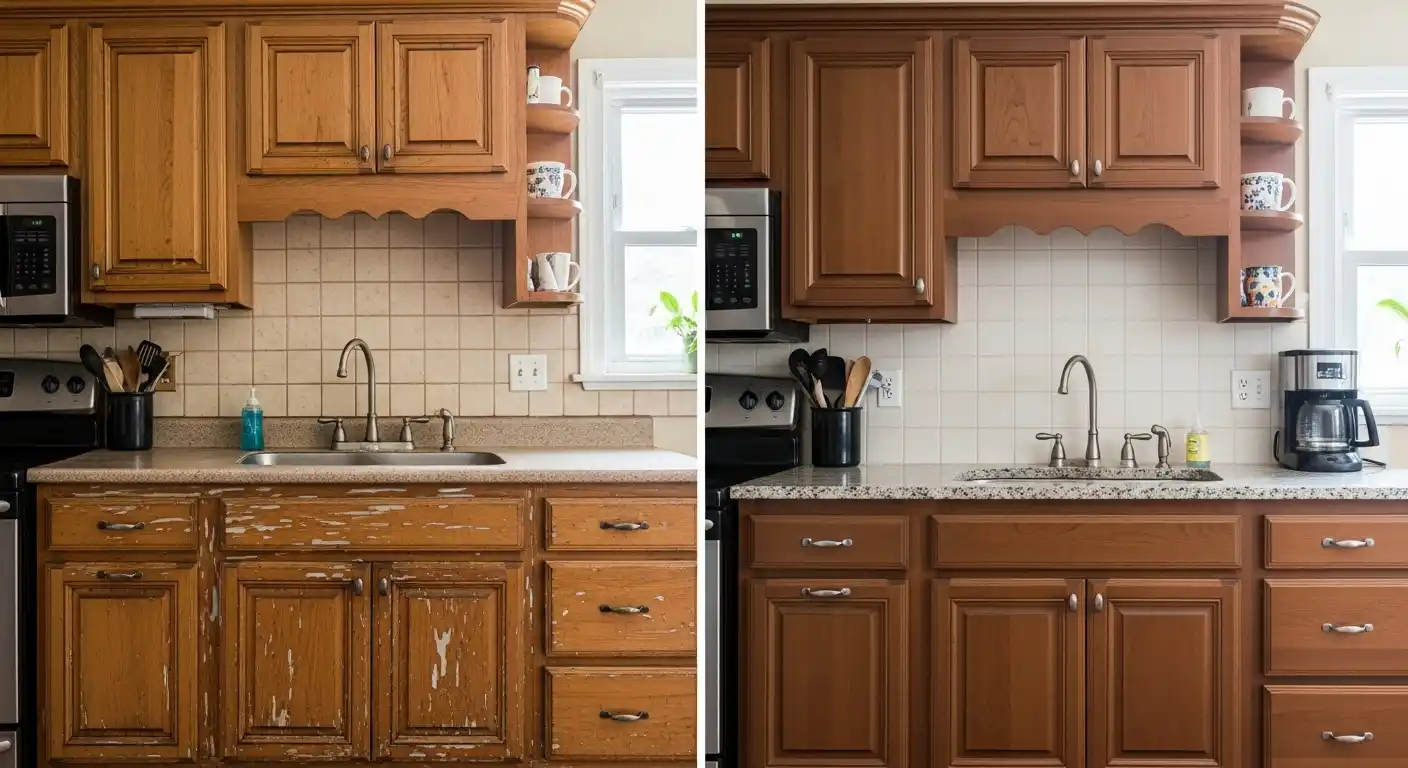
If your kitchen cabinets have lost their shine or started to look dull, staining them can completely change their look without spending a fortune. I’ve always believed that cabinets set the tone for your entire kitchen, and a fresh stain can bring out the beauty of the wood while giving your space a clean and updated feel.
In this guide, I’ll walk you through how to stain kitchen cabinets step by step, just like professionals do it. You’ll learn everything from choosing the right stain to preparing, applying, and finishing it the right way. Staining cabinets might seem tricky at first, but once you understand the process, it’s a project you can handle confidently.
By the end of this guide, you’ll know how to give your cabinets a smooth, even finish that highlights the natural wood grain and makes your kitchen feel brand new again. So, grab your tools and get ready to bring your kitchen back to life with a beautiful stain finish!
Understanding What Kitchen Cabinet Staining Really Means
Before picking up a brush, it helps to understand what staining actually does. When you stain your kitchen cabinets, you’re not just coloring the surface, you’re enhancing the natural beauty of the wood. Paint covers wood completely, but stain soaks into it and brings out the unique grain patterns that make each cabinet one of a kind.
Staining works best on real wood cabinets. It gives a rich, natural look that paint can’t match. You can go for a light tone to keep things bright or choose a darker shade for a warm and cozy feel.
Why we Prefer Staining Instead of Painting My Cabinets
I’ve always preferred staining because it keeps the character of the wood alive. It’s also more affordable than replacing the cabinets and doesn’t take as much time as a full remodel. Plus, if the cabinets ever start looking dull again, you can refresh them easily without sanding everything down to bare wood.
When to Stain, Paint, or Replace
Staining is perfect if your cabinets are solid wood and still in good shape. It’s a cost-friendly way to update your kitchen while keeping that classic wooden texture.
In the next part, I’ll share the tools and materials you’ll need so you can prepare everything before starting the project.
Gather Everything You Need Before You Start
Before I start any staining project, I make sure all my tools and materials are ready. It saves time and keeps things running smoothly once I begin. Having the right setup also helps you get an even, professional-looking finish without any frustration halfway through.
Let’s break it down into what you’ll actually need.
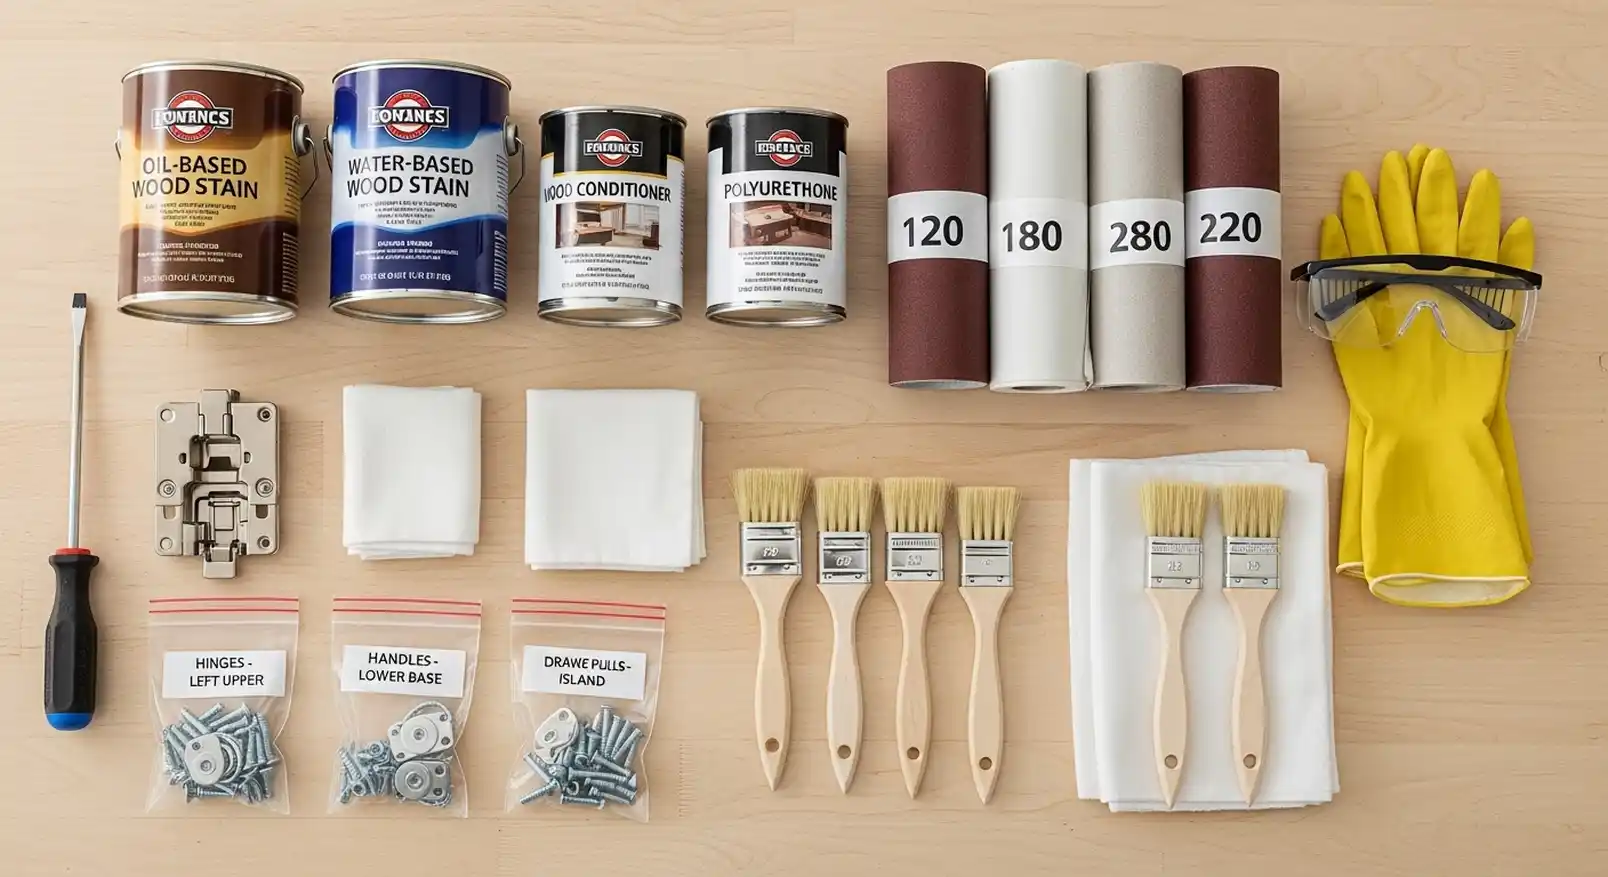
Tools You’ll Need:
- Screwdriver: For removing cabinet doors and hardware.
- Sandpaper: (120, 180, and 220 grit): Helps you smooth the surface and remove the old finish.
- Tack Cloth: Wipes off all dust before staining.
- Drop Cloth or Plastic Sheet: Keeps your floor clean from drips.
- Foam Brushes or Rags: For applying the stain evenly.
- Paint Stir Stick: To mix your stain before using it.
- Rubber Gloves and Safety Glasses: Protect your hands and eyes.
- Clean Rags: Useful for wiping away extra stain or polish.
- If you’re serious about neat results, a sanding block or a power sander can save you effort, especially when working on multiple cabinets.
Materials You’ll Need
- Wood Stain: Choose between oil-based, water-based, or gel stain based on your preference.
- Wood Conditioner: Prepares the wood and helps the stain soak in evenly.
- Protective Finish: A clear topcoat like polyurethane or lacquer to seal and protect your work.
- Cleaner or Degreaser: Removes grease buildup before sanding.
I also like to test my stain on a small hidden area before starting the full job. It gives me a clear idea of how the color will turn out on that particular wood type.
Once you’ve got all your tools and materials in place, you’re ready to pick the perfect stain for your cabinets. That choice makes a big difference in the final look, and I’ll guide you through it next.
Choose the Right Stain for Your Kitchen Cabinets
Picking the right stain is one of the most important parts of the whole project. The color, type, and finish you choose will decide how your cabinets look once everything is done. I’ve learned that taking a little extra time to choose the right stain always pays off in the end.
Types of Stains You Can Use
Each type of stain behaves differently, so understanding them helps you choose what works best for your cabinets.
Oil-Based Stain:
This is the traditional option. It goes deep into the wood and gives a rich color that lasts a long time. It takes longer to dry, but that extra time helps you spread it evenly and fix any spots before it sets.
Water-Based Stain:
This option dries faster and has a milder smell. It’s easier to clean up and great if you want a lighter, more natural tone. It also works well in humid areas.
Gel Stain:
This one sits on top of the wood rather than soaking in deeply. It’s perfect if your cabinets are vertical or have detailed designs, because it doesn’t drip easily. I find gel stain very beginner-friendly and forgiving if you make a small mistake.
How to Pick the Right Shade
When I choose a stain color, I like to think about how it will blend with the kitchen’s lighting and decor. Light stains, like oak or maple tones, make a kitchen feel open and bright. Darker stains, like walnut or espresso, create a rich, cozy look.
If you’re unsure, test a small patch on the inside of a cabinet door. The way stain looks in the can can be very different once it’s on wood. Lighting, wood grain, and number of coats all affect the final color.
Choosing the Finish That Fits Your Style
After picking the color, you’ll also choose the finish. Each one gives a different level of shine:
- Matte Finish: Natural look with little to no shine.
- Satin Finish: A soft glow that works well in most kitchens.
- Semi-Gloss or Gloss Finish: Bright and easy to clean, great for modern spaces.
If you want a warm and natural appearance, satin usually strikes the best balance between beauty and practicality.
The right stain and finish combination can completely change how your cabinets look. Once you’ve picked your color and finish, you’re ready to start the actual process. Let’s move to the most exciting part staining the cabinets step by step.
Step-by-Step Guide: How to Stain Kitchen Cabinets Like a Pro
Now that you’ve chosen your stain and finish, it’s time to get to work. Staining kitchen cabinets takes patience and attention to detail, but once you see the final result, you’ll know it’s worth the effort. Here’s how I like to go through each step so nothing gets missed.
Step 1: Remove the Cabinet Doors and Hardware
Start by taking off all the cabinet doors, drawers, and hardware. I like to label each piece using masking tape so I know exactly where everything goes when it’s time to reassemble. Keep the screws and hinges in a small container or plastic bag to avoid losing them. This small step saves a lot of frustration later.
Step 2: Clean the Surfaces Thoroughly
Cabinets collect grease and dirt over time, especially near the stove. Before sanding, I clean every surface with a good degreaser or a mix of warm water and mild dish soap. A clean surface helps the stain soak in evenly. Wipe them dry completely before moving on.
Step 3: Sand the Cabinets Smooth
Sanding is the foundation of a good stain job. I usually start with 120-grit sandpaper to remove the old finish, then move to 180-grit and finish with 220-grit for a smooth surface. Always sand in the direction of the wood grain to avoid scratches.
After sanding, wipe the cabinets with a tack cloth to remove all dust. Any leftover dust will ruin the finish later.
Step 4: Apply a Wood Conditioner
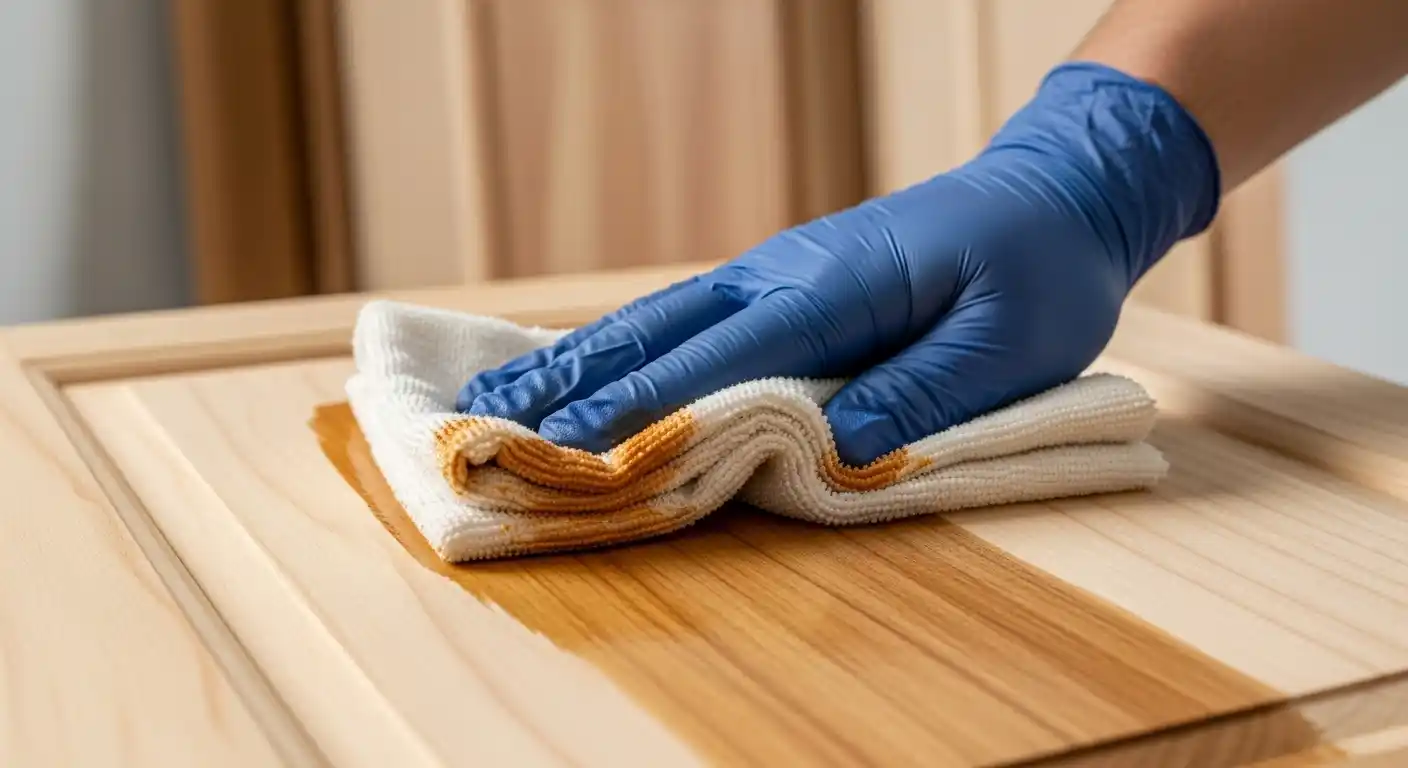
I always recommend using a pre-stain wood conditioner, especially for soft woods like pine or birch. It helps the stain absorb evenly and prevents blotchy spots. Apply it with a clean brush or cloth, wait about 15 minutes, and wipe off any excess before moving on to staining.
Step 5: Apply the Stain
Now comes the fun part. Stir the stain well before use. Using a foam brush or clean rag, apply the stain in the direction of the wood grain. Work in small sections so you have control over how much stain stays on the surface.
Let it sit for a few minutes (check the product label for timing), then use a clean rag to wipe off any extra stain. The longer you leave it before wiping, the darker the color will be.
Step 6: Add a Second Coat if Needed
If you want a deeper tone, wait for the first coat to dry completely and then apply a second one the same way. Always keep your strokes even and light. You can adjust the darkness by controlling how many coats you apply.
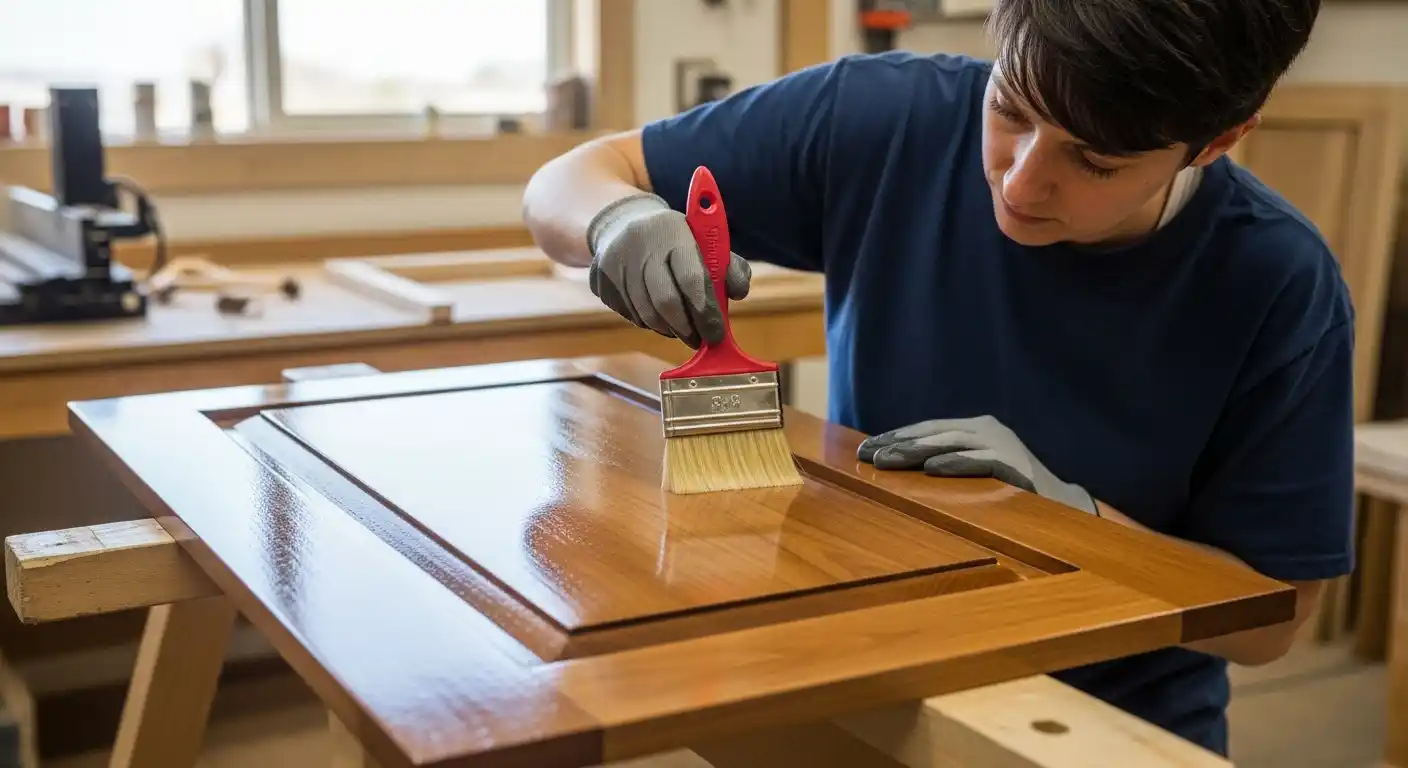
Step 7: Apply a Protective Finish
Once the stain is dry, protect your hard work with a clear topcoat. I like polyurethane because it’s strong and gives a smooth finish. Use a clean brush and apply thin coats in the direction of the grain.
Let each coat dry completely, then lightly sand with fine-grit sandpaper between coats for the smoothest surface. Two to three coats usually give a durable, long-lasting finish.
Step 8: Reassemble the Cabinets
After everything is dry, it’s time to put your kitchen back together. Reattach the doors, drawers, and hardware. If you want an upgraded look, this is a great time to change the handles or knobs small changes can make a big difference.
By following these steps carefully, you’ll get that professional-looking finish that highlights the beauty of your wood cabinets. Up next, I’ll share a few common mistakes people make and how you can easily avoid them.
Pro Tips for a Professional Finish That Lasts
After staining quite a few cabinets myself, I’ve picked up some tricks that make a big difference in how the final result turns out. These little details separate a basic job from a smooth, professional looking finish. If you follow these tips, your cabinets will look polished and last much longer.
1. Always Work With the Grain
When applying stain or finish, follow the direction of the wood grain. Going against it can leave streaks and uneven color lines. Working with the grain helps the stain soak in naturally and keeps the wood’s texture visible.
2. Use Foam Brushes or Clean Cloths
I like using foam brushes because they apply the stain evenly without leaving brush marks. For wiping, lint-free clothes work best. They don’t shed fibers and help blend the stain smoothly.
3. Don’t Skip the Test Area
Before staining the whole cabinet, test your stain on the inside of a door or an unseen section. This small test helps you check the color, absorption, and finish before committing to the entire surface. It saves time and prevents unwanted surprises later.
4. Apply Thin Layers of Stain and Finish
Thin coats always give you better control. Thick coats might look darker at first, but they can cause drips, blotches, or sticky spots. A couple of thin coats will dry faster and look smoother than one heavy coat.
5. Keep Lighting Consistent
Lighting affects how stain color appears. I like to stain in daylight or use a good work light so I can see how evenly the color is going on. Poor lighting often leads to missed spots or uneven tones.
6. Lightly Sand Between Coats
Once each coat dries, lightly sand it with fine-grit sandpaper before applying the next. This smooths out any dust or uneven areas and helps the next coat bond better. Just remember to wipe away the dust before moving on.
7. Take Your Time
Rushing through staining never ends well. Let each coat dry completely and give yourself enough time to work comfortably. The more care you put into each step, the better your cabinets will look when you’re done.
With these tips, your cabinets won’t just look freshly stained, they’ll have that clean, professional touch that stands out. Now, let’s talk about how to take care of them so they stay beautiful for years to come.
Conclusion: Give Your Kitchen a Fresh Start with Stained Cabinets
Staining your kitchen cabinets is one of the most rewarding home projects you can take on. It doesn’t just save you money it gives your kitchen a fresh and natural look that highlights the beauty of real wood. Once you understand how to clean, sand, stain, and seal properly, the process becomes simple and enjoyable.
I’ve always believed that the best transformations come from small changes done with care. By following the right steps, using quality materials, and taking your time, you can give your cabinets a professional finish that lasts for years. Every time you walk into your kitchen, you’ll feel proud knowing you did it yourself.